Creating Parallel
Hole Objects for JN6
A problem that has always plagued the Jack Nicklaus series of golf games since the beginning revolves around its use of a single hole design system. Since each hole is a separate entity, creating believable parallel holes is extremely difficult. Many times, it is basically impossible because you can not create elevations or place objects outside the hole window. This can create a big visual eyesore of vast areas of deadspace, something that generally does not look natural for a golf course.
 Since the early
days of JN4, this problem has been coined "The Green Line".
A change was made to reduce this problem with JN6. Unlike JN5, the horizon
is now connected to the hole terrain data. So, in JN5, if you had a
large elevation drop, the game would place terrain such as heavy rough
between where the horizon art ended and the terrain data started. The
result was a large wall of green color. Not very attractive. JN6's horizons
now "float" and will remain attached to the hole. This basically
fixes "The Green Line" problem, but we are still left with
the issue of all of the dead space outside of the hole window.
Since the early
days of JN4, this problem has been coined "The Green Line".
A change was made to reduce this problem with JN6. Unlike JN5, the horizon
is now connected to the hole terrain data. So, in JN5, if you had a
large elevation drop, the game would place terrain such as heavy rough
between where the horizon art ended and the terrain data started. The
result was a large wall of green color. Not very attractive. JN6's horizons
now "float" and will remain attached to the hole. This basically
fixes "The Green Line" problem, but we are still left with
the issue of all of the dead space outside of the hole window.
To get around this problem, many designers have employed different techniques. The most commonly used one is placing large hills or mounds around the outside of holes. Large numbers of trees are then usually placed along the sides of each hole as well. This usually does the trick, but what results is that courses end up having a similar feel due to all of the mounding, and it can be almost like playing in a bowling alley. Also, since trees are a large part of this technique of hiding the deadspace, one type of course design is seen a large majority of the time: parkland. I'm not saying there is anything wrong with a parkland layout, but what the JN series needs is more variety in the styles of course designs.
Unfortunately, I think the fact that course reviewers have focused on the "The Green Line" problem as a major issue for course designers to overcome with their work is a big part of the problem. Is hiding this visual eyesore more important than the course design itself? Should designers not attempt to create courses in links, beachside, or desert settings out of fear that the dead space might show? I think that is much too high a price to pay because of a visual limitation in the JN series.
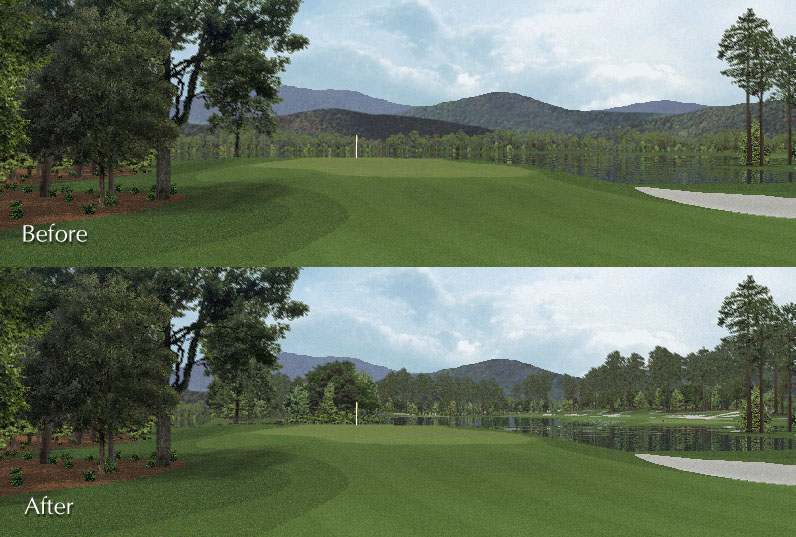
So, I've come up with a technique that eliminates the problem of the dead space for JN6 courses in some situations. The increase in the amount of custom objects allowed in JN6 designs made it possible. It basically involves turning screenshots of parallel holes into objects. You then place them on your hole, and they act almost like a matte painting on a movie set. Above you will see an example. It is a before and after screenshot from the 10th at Rolling Evergreen. Click on the thumbnail to see a full sized screenshot.
I've attempted to keep this tutorial as general as possible so that you could apply the techniques to whatever image editing software you use. I'm assuming that you know how to create custom objects and add INI entries for them.The technique isn't perfect, but it should hold us over until the Jack Nicklaus series finally moves to a unified landplot system. Well, without further delay, here are the steps:
-
Download the Big Blue custom horizon I have created. Unzip its contents into your course's folder. This will be used to make it much easier to eliminate unwanted background items from your screenshots.
-
Add the following entry into your course's INI file:
[HORIZONS]
Bigblue11.pcx=Big Blue -
Open up your course in the JN6 Course Designer.
-
Plan out which holes will benefit from a parallel hole object. They work best when placed at the far left or right of a hole window. This is because a player generally can't get to the sides or behind the object, which will ruin the illusion. For this reason, the top or bottom of the hole window doesn't work well at all for placing parallel hole objects. So, let's say you have a par 5 and there should be a par 4 that can be seen beyond it. That is a perfect spot for a parallel hole object.
-
Open up the hole you want to turn into a parallel hole object. Position your viewing arrow so that it is in the approximate area where the parallel hole would start on the hole where you plan to place the parallel hole object on. I'm sure that description is confusing. Here is an example: Say you want to place a parallel hole object on hole 10, showing the hole 11's teeing area in the distance. Go to hole 11 and place the view arrow in the general area where the hole window ends on the 10th, which is where you will be placing the parallel hole object.
-
Change your horizon for the hole to Big Blue.
-
Do a hole render and choose the Close camera angle. I have found that the Normal, Tower, and Aerial camera angles give the appearance that all holes are running uphill, which is why I use the Close view. Once you have the render ready, maximize its window so that you get the biggest rendered image possible.
-
Take a screenshot. This can be done in two ways. The first is to press the [Print Scrn] button on your keyboard. You should then be able to open up your image editing software, and paste the image contents from the clipboard into a new image. Or, you can use a screen capture utility to perform the same function. I've got a freeware utility you can download called PrintKey.
-
If you have a particularly wide viewpoint you want to capture for your parallel hole object, you may need to take multiple screenshots. These can then be seamed together in your image editing software.
-
Open up your image editing software and your screenshot. Since what was the sky and horizon art is now just blue, it will be relatively easy to eliminate. Most programs have a "Magic Wand" tool that will allow you to select an area by its color. Use this to select the blue areas and then replace it with your transparent color (usually purple).
-
You'll probably have to do some editing to your image, and it can be hard at times to figure out where the best place is to crop the image. Seaming two or more screenshots together is also a challenge. Once the image is done, save it out as a standard JN6 custom object in the PCX format, and put it in your course's folder.
-
Add the appropriate entry for your parallel hole object in your INI file. One word of warning. For the height, you will need to use a value of 10. There is a bug in JN6 that seems to affect extra wide objects. If you enter an accurate height value, the width will be skewed. Therefore, I limit the height to 10, and figure out what the width should be proportionally. Here is a quick and dirty way I use to figure out the width of custom objects. I open up my image in Photoshop and go to its Image Size. I can then enter a new height for the image. When I enter my height in meters, Photoshop automatically figures out what the width should be proportionally. I then simply enter this width value into my INI file. Of course, I do not accept this image size change. Hopefully your image editing software works similarly to this. It is a sure-fire method for keeping your custom art proportional.
-
Open up the JN6 Course Designer again and load up your course. Go to the hole you want to place the parallel hole object on. After you've placed it, you'll need to resize it. Since we only had a height of 10 meters entered in the INI file, you'll want to double-click on the object and manually adjust its height. It will probably take some tinkering until you have the position and size right.
-
Once you have all of your parallel hole objects done and in place, you can remove the Big Blue entry from your INI file and delete or relocate its PCX files.
-
That's about it. Once you've gone through the process a couple times, you will probably find that it goes pretty quickly (compared to most JN6 custom art creation that is.) Feel free to e-mail me if you have any questions about this process.
WARNING: In working on Cypress Point for JN6, I've discovered a problem that can sometimes occur with this technique. Be careful not to place your parallel objects too close to parts of your hole that come into play, such as a green. If you do, it can look as though the ball is bouncing off an invisible object when an approach shot reaches the green. Pay attention to the width of your object and where it is placed when putting objects to either the left or right sides of your hole window. Consider that JN6 treat your 2D object almost as 3D in that its collision properties will extend to all sides of the object in relation to its width. Check out this recorded shot from the 12th at Rolling Evergreen that Garry Clarke sent me. It demonstrates what can happen if a parallel object gets too close too a green. Make sure you push your parallel hole objects as far as you can outside the hole window to avoid parts of the hole that come into play. To get around this problem on the JN6 version of Rolling Evergreen, about all I can recommend unfortunately is to avoid using pin position 1. Sorry.